> ## Documentation Index
> Fetch the complete documentation index at: https://docs.orionramp.com/llms.txt
> Use this file to discover all available pages before exploring further.
# Quickstart
> How to setup account and accept payments
export const initializePaymentUrl = 'https://test.api.orionramp.com/api/transaction/initialize';
export const dashboardUrl = 'https://test.orionramp.com';
## Creating an account
You need to first create an account on our platform. You can go there by clicking the Dashboard button in the navbar or by clicking [here](https://test.dashboard.orionramp.com/).
After this you can can create a business on our platform pressing the **'Create Your First Business'** button and filling the form with the details of your business.  The wallet address you enter in the form will be the account that receives the onramped tokens
After filling in the form, the business you have created will be in a pending status as our team reviews it. In the Settings page you can go to the API keys tab to create a test environment. In the test environment you can test the integration as your business is being reviewed.
After your business is approved you can create a live environment.
## Creating an environment
An environment holds the private keys you'll use to interact with our APIs. There are two types of environments:
1. **Test environment** - is used to test your integration with our platform. The money sent in this environment is not real and the tokens received are on testnet.
2. **Live environment** - will be used for the live integration with our platfrom. The money sent is real and the tokens you'll receive are on mainnet
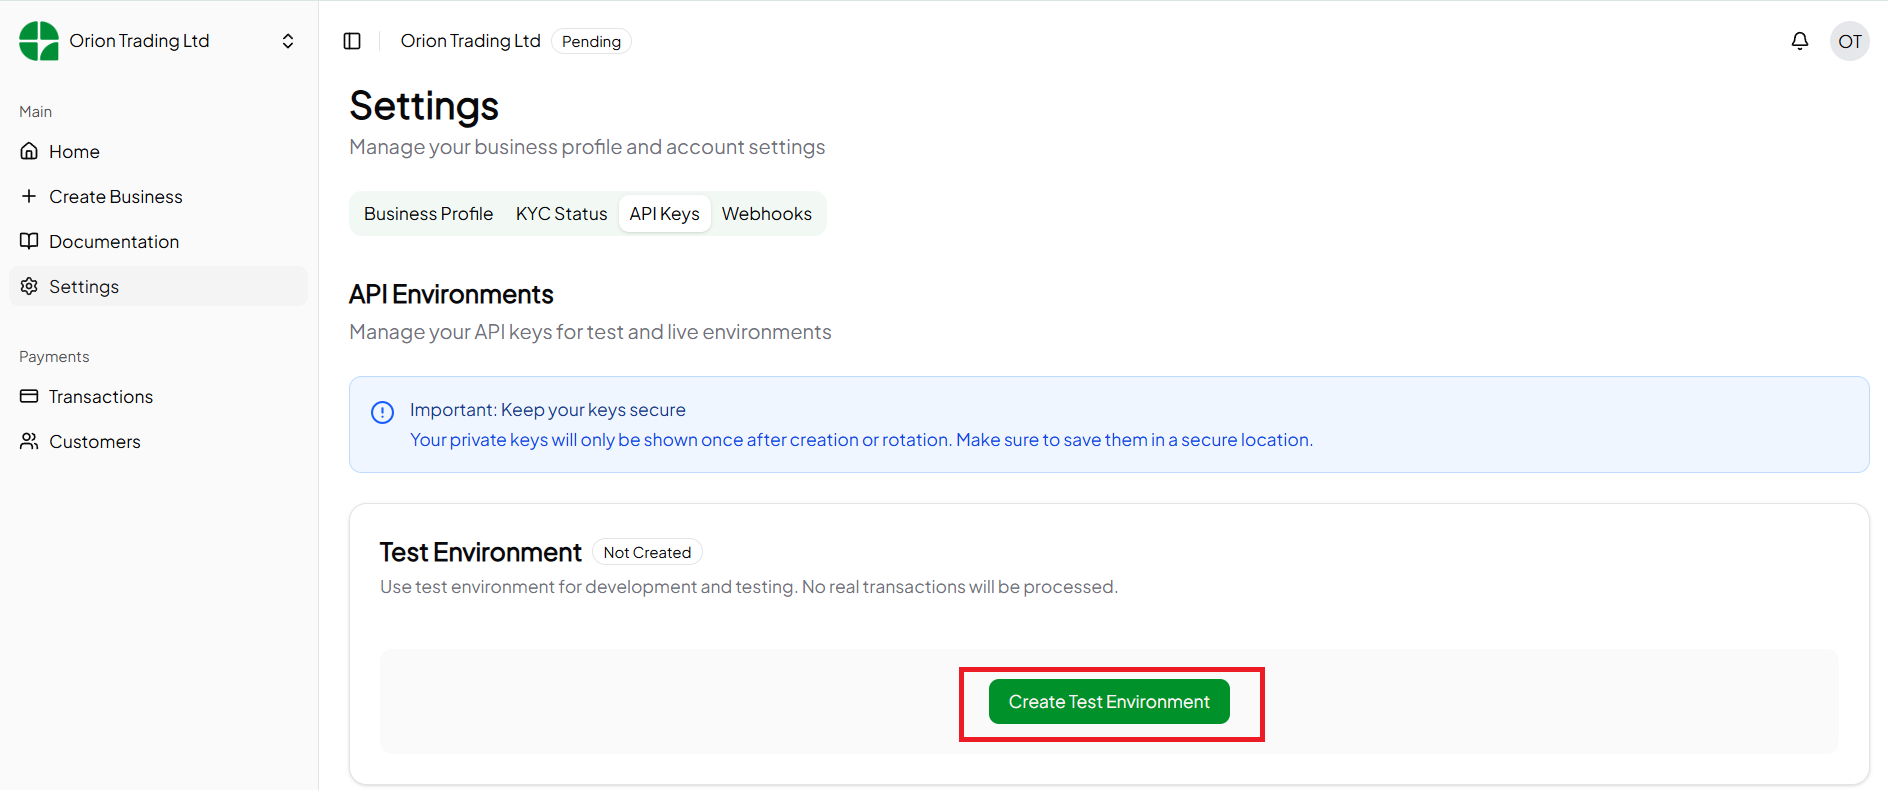
You can create an environment by going to the Settings page and pressing the API Keys tab. Over there you can click 'Create Test Environment' button to create a test environment as shown in the image below
The wallet address you enter in the form will be the account that receives the onramped tokens
After filling in the form, the business you have created will be in a pending status as our team reviews it. In the Settings page you can go to the API keys tab to create a test environment. In the test environment you can test the integration as your business is being reviewed.
After your business is approved you can create a live environment.
## Creating an environment
An environment holds the private keys you'll use to interact with our APIs. There are two types of environments:
1. **Test environment** - is used to test your integration with our platform. The money sent in this environment is not real and the tokens received are on testnet.
2. **Live environment** - will be used for the live integration with our platfrom. The money sent is real and the tokens you'll receive are on mainnet
You can create an environment by going to the Settings page and pressing the API Keys tab. Over there you can click 'Create Test Environment' button to create a test environment as shown in the image below
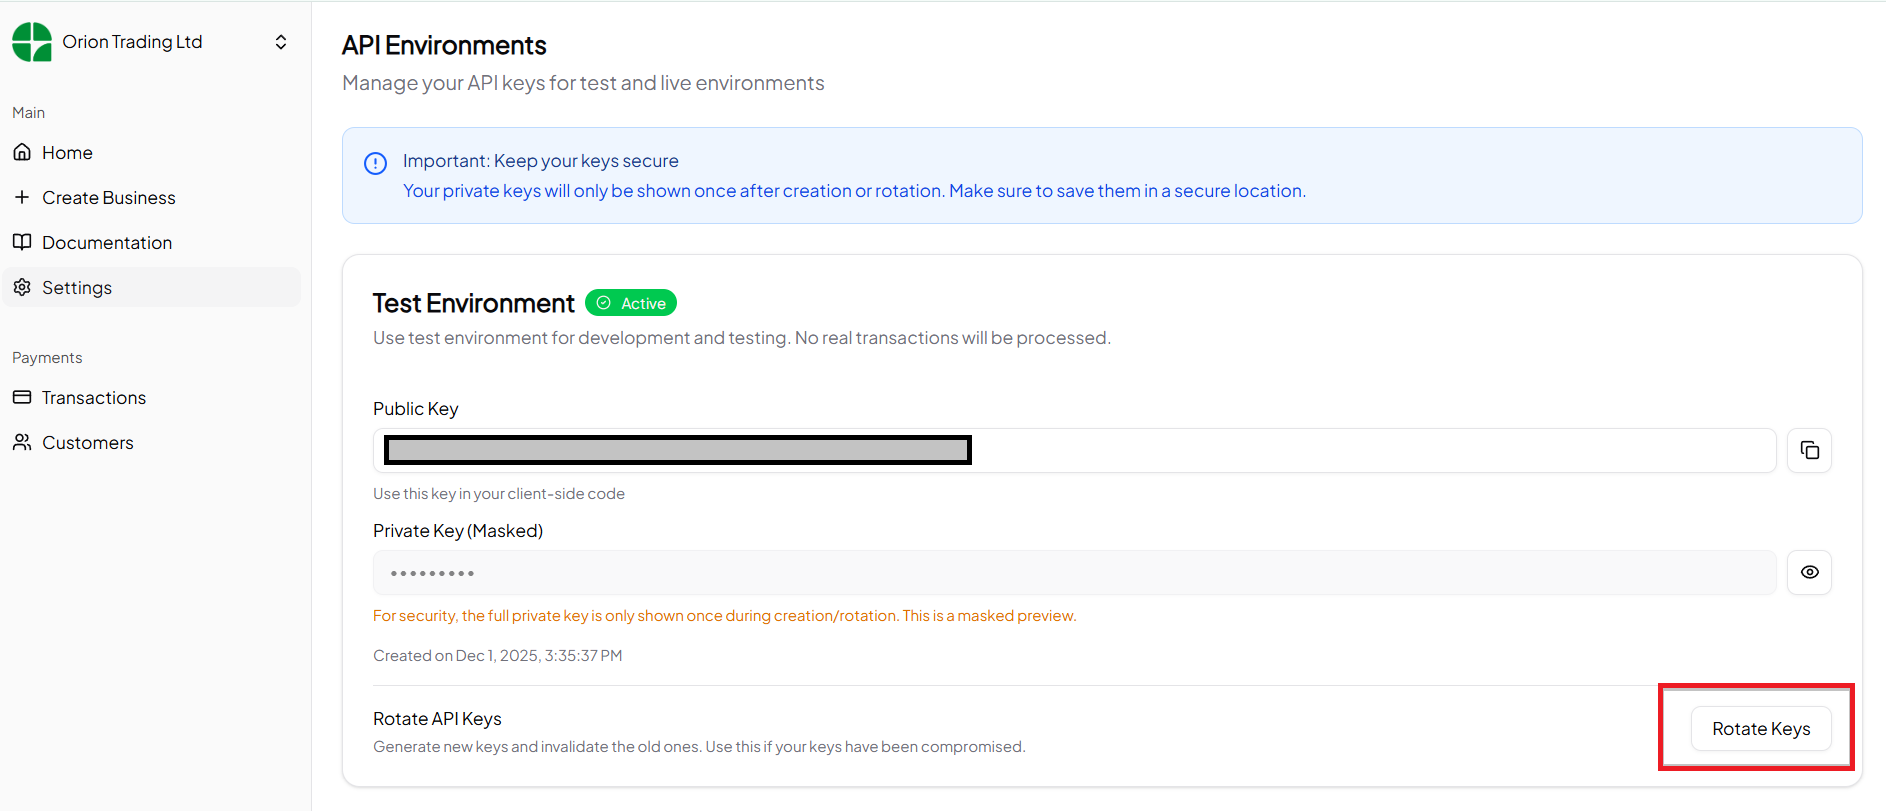
 When creating the environment, you'll be shown the private key that you'll be including in API calls. Make sure to store this safely. Exposing this key would allow attackers to accept payments as you. In case your private key has been exposed you can rotate them by pressing the rotate keys button below.
 To create a live environment you're business needs to be approved
## Creating a payment request
With the API key you've gotten in the previous step you can now initialize a payment request. A payment request is initialized when you want to receive a payment from your users.
For example, if you have a Buy button on your DApp and you want to allow users to pay using fiat you would initialize a payment request on your backend by calling the API endpoint that will be shown. The endpoint will then
return a payment url that you'll show the user. The user will then pay for the product in this page. When the user has succesfully paid the tokens will be sent to your account. When the tokens are sent to your account a success
message will be sent to your webhook url. We will now show how all of this will be done.
To initialize a payment request you'll make an API call to this endpoint {initializePaymentUrl}
An example of a payment request for 100 Kenya shillings is shown below. For more details on how to interact with the API you can look at the Endpoint examples section of the documentation.
```javascript initializePayment.js theme={null}
async function initializePayment() {
const response = await fetch("https://test.api.orionramp.com/api/transaction/initialize", {
method: "POST",
headers: {
"Content-Type": "application/json",
"Authorization": "Bearer "
},
body: JSON.stringify({
token: "KESy_TESTNET",
amount: 100,
email: "",
currency: "KES",
metadata: {
orderID: ""
}
})
});
if (response.status !== 201) {
throw new Error("Could not initialize payment");
}
const json = await response.json();
}
```
The JSON object returned when a payment request is succesfully returned looks like this.
```json theme={null}
{
reference: 'TXN_TEST_***************************************',
authorization_url: 'https://checkout.paystack.com/**********',
access_code: '**********'
}
```
The **authorization\_url** is the URL that you should redirect your user to for them to complete payment.
After the user has succesfully completed payment at the authorization URL the tokens will be transferred to the crypto account entered when you created a business. An event will be sent in the webhook URL entered when creating the test environment to notify you of a successful payment or a failed payment.
More details are shown in the Webhook section of the documentation.
To create a live environment you're business needs to be approved
## Creating a payment request
With the API key you've gotten in the previous step you can now initialize a payment request. A payment request is initialized when you want to receive a payment from your users.
For example, if you have a Buy button on your DApp and you want to allow users to pay using fiat you would initialize a payment request on your backend by calling the API endpoint that will be shown. The endpoint will then
return a payment url that you'll show the user. The user will then pay for the product in this page. When the user has succesfully paid the tokens will be sent to your account. When the tokens are sent to your account a success
message will be sent to your webhook url. We will now show how all of this will be done.
To initialize a payment request you'll make an API call to this endpoint {initializePaymentUrl}
An example of a payment request for 100 Kenya shillings is shown below. For more details on how to interact with the API you can look at the Endpoint examples section of the documentation.
```javascript initializePayment.js theme={null}
async function initializePayment() {
const response = await fetch("https://test.api.orionramp.com/api/transaction/initialize", {
method: "POST",
headers: {
"Content-Type": "application/json",
"Authorization": "Bearer "
},
body: JSON.stringify({
token: "KESy_TESTNET",
amount: 100,
email: "",
currency: "KES",
metadata: {
orderID: ""
}
})
});
if (response.status !== 201) {
throw new Error("Could not initialize payment");
}
const json = await response.json();
}
```
The JSON object returned when a payment request is succesfully returned looks like this.
```json theme={null}
{
reference: 'TXN_TEST_***************************************',
authorization_url: 'https://checkout.paystack.com/**********',
access_code: '**********'
}
```
The **authorization\_url** is the URL that you should redirect your user to for them to complete payment.
After the user has succesfully completed payment at the authorization URL the tokens will be transferred to the crypto account entered when you created a business. An event will be sent in the webhook URL entered when creating the test environment to notify you of a successful payment or a failed payment.
More details are shown in the Webhook section of the documentation.